
目录
NTP (Network Time Protocol 网络时钟协议) 是分布式环境中的重要基础设施,本文演示在 Rocky Linux 9 上自动化部署 Chrony Server、以及 Chrony Client。
本文包含以下主题:
- 部署环境要求
- Ansible Roles 介绍
- 部署 Chrony Server
- 部署 Chrony Client
- 总结
1.1 部署环境要求
示例通过 Ansible 自动化完成,需要 Ansible 控制节点;Chrony 属于 C/S 架构,需要至少一个 Server 节点,然后配置 Client 节点指向 Server 节点,以从 Server 同步时钟。
在本示例中,Ansible 控制节点同时作为 Chrony Client 节点,因此完成本示例,至少需要两个 Rocky Linux 9 节点。
1.1.1 节点信息
两个节点分别为 2 核 CPU、2G 内存的虚拟机。
Ansible (Chrony Client) 节点信息:
# IP:10.211.55.18
# 主机名:automate-host.aiops.red
# 系统版本:Rocky Linux release 9.0
Chrony Server 节点信息:
# IP:10.211.55.20
# 主机名:ntp1.server.aiops.red
# 系统版本:Rocky Linux release 9.0
1.1.2 节点要求
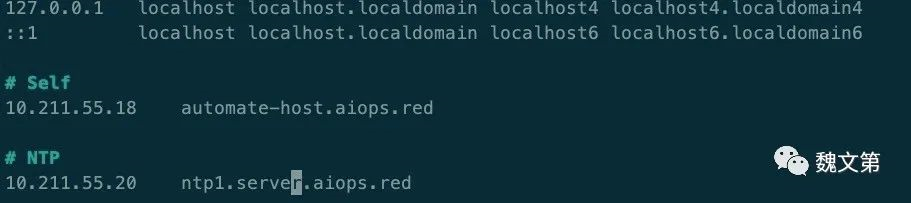
Chrony Client 能够通过主机名 ”ntp1.server.aiops.red“ 访问 Chrony Server。在生产环境中,更多是通过 DNS 实现的;但在本次演示中,通过编辑 Chrony Client 的 /etc/hosts 文件添加 Server 的 IP 与主机名条目:
sudo vim /etc/hosts
为了实现整个过程的自动化,Ansible 控制节点需要通过 aiops 用户 (或其他有免密 sudo 权限的普通用户) 免密登录其自身及 Chrony Server 节点,并可以免密执行 sudo 命令。
通过以下步骤实现 aiops 的免密登录:
1、如果 aiops 用户还没有秘钥对,执行命令创建用于免密登录 SSH 的秘钥对:
[aiops@automate-host ~]$ ssh-keygen -t rsa
如果已经创建过秘密对,则忽略步骤 1。
2、使用 Ansible Playbook 将公钥分发给两个节点的 aiops 用户:
Ansible Inventory hosts 文件内容如下:
[automate]
automate-host.aiops.red

[ntp]
ntp1.server.aiops.red
Ansible authorized_key.yaml Playbook 文件内容如下:
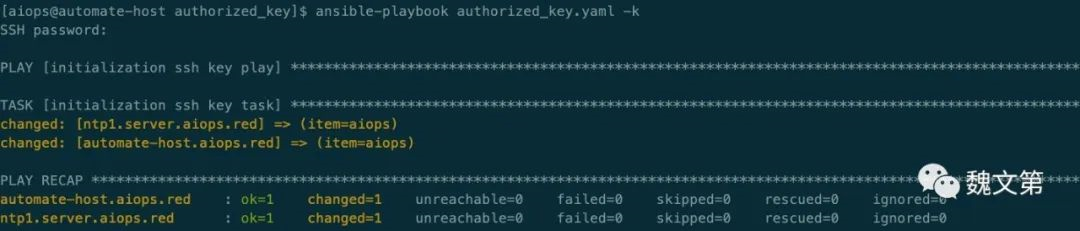
#!/usr/bin/env ansible-playbook
---
- name: initialization ssh key play
  hosts: all
  gather_facts: false
  become: true
  tasks:
    - name: initialization ssh key task
      ansible.builtin.authorized_key:
        comment: aiops user public key
        user: aiops
        key: "{{ lookup('file', '/home/aiops/.ssh/id_rsa.pub') }}"
...
执行 authorized_key.yaml Playbook:
ansible-playbook authorized_key.yaml -k
根据 Inventory hosts 为 Ansible 托管节点设置主机名。将 Chrony Server 的主机名设置为 ntp1.server.aiops.red。change_hostname.yaml Playbook 文件内容如下:
#!/usr/bin/env ansible-playbook
---
- name: change host name play
  hosts: all
  gather_facts: false
  become: true
  tasks:
    - name: change host name task
      ansible.builtin.shell:
        cmd: hostnamectl set-hostname "{{ inventory_hostname }}"

...
执行 change_hostname.yaml Playbook:
ansible-playbook change_hostname.yaml

1.2 Ansible Roles 介绍
在之前的文章中,讨论了 Ansible Playbook。Ansible Roles 用于将单个大型的 Playbook 拆分成多个文件,简化 Playbook 编写的复杂度,并使 Playbook 更易重复使用。
1.2.1 Role 的基本结构
在定义 Role 时需要指定名称。例如 chrony_server Role 用于 Chrony Server 的安装与配置;chrony_client Role 用于 Chrony Client 的安装与配置。
Ansible 会在与 Playbook 文件同级的 roles/ 目录下查找 Role,也可以通过 Ansible 配置文件中的选项,设置 Role 的存储路径:
[defaults]
roles_path=~/.ansible/roles:/usr/share/ansible/roles:/etc/ansible/roles:~/roles
~/roles 是我自定义的存放 Roles 的目录,可以使用 ansible-galaxy 命令在该目录下创建 chrony_server、chrony_client Role:
ansible-galaxy role init --init-path ~/roles chrony_server
ansible-galaxy role init --init-path ~/roles chrony_client

查看 Role 的目录结构:
tree chrony_server
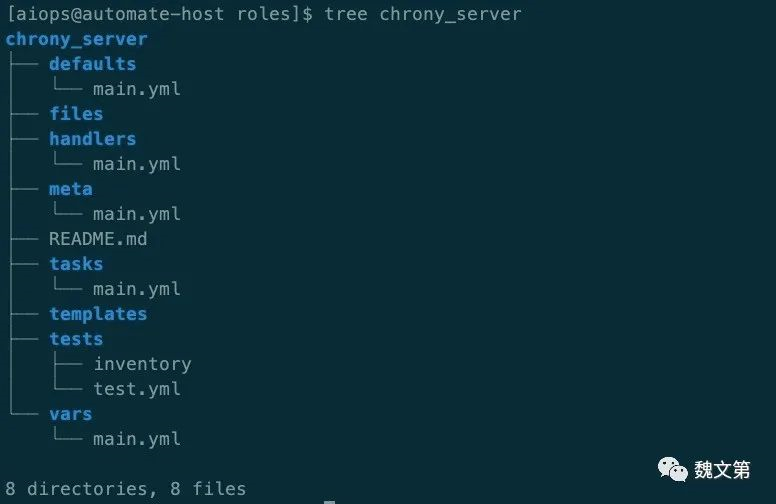
chrony_server/defaults/main.yml:设置变量。此处设置的变量,可以被 Playbook 中的变量覆盖。
chrony_server/files/:存放了要拷贝到托管节点的文件或脚本。
chrony_server/handlers/main.yml:定义 Role 中用到的 Handlers。
chrony_server/meta/main.yml:Role 的元数据信息。
chrony_server/README.md:Role 自述文件。
chrony_server/tasks/main.yml:定义了要执行的任务,是 Role 所有动作的入口。
chrony_server/templates/:存放了要上传到托管节点的模板文件。
chrony_server/tests/:该目录中定义用于测试 Role 的 Playbook。
chrony_server/vars/main.yml:设置不希望被覆盖的变量,此处设置的变量优先级较高,
这些文件和目录都是可选的。如果 Role 中没有 handlers,可以删除 handlers/ 目录,没有提供用于测试的 Playbook,可以删除 tests/ 目录。
1.2.2 Chrony Server Role
接下来编写用于部署 Chrony Server 的 Role。
Chrony Server 通过公共的 NTP 服务获取准确时间。定义名为 ntp_server 的列表类型变量,作为 Chrony Server 的时间源。有很多公开的 NTP 服务,该变量的值很可能被使用者替换,因此把它定义在 defaults/main.yml 中:
---
# defaults file for chrony_server
ntp_server:
  - cn.pool.ntp.org
  - tw.pool.ntp.org
在 tasks/main.yml 中定义任务:
---
# tasks file for chrony_server
- name: install chronyd service task
  become: true
  ansible.builtin.dnf:
    name: chrony
    state: latest

- name: start chronyd service task
  become: true
  ansible.builtin.systemd:
    name: chronyd.service
    state: started
    enabled: true

- name: turn on ntp service in the firewall task
  ansible.posix.firewalld:
    service: ntp
    permanent: true
    immediate: true
    state: enabled

- name: generate chrony.conf file from the template task
  become: true
  ansible.builtin.template:
    src: chrony_server.conf.j2
    dest: /etc/chrony.conf
    group: chrony
  notify: restart chronyd service handler
在 tasks/main.yml 中定义了四个任务,安装、启动 Chrony 服务,在防火墙中开启对 NTP 服务的访问,通过模板渲染 Chrony Server 的配置文件,并在配置文件变化时,通知 Handlers 重启 Chrony Server。
在 handlers/main.yml 中定义 ”restart chronyd service handler“:
---
# handlers file for chrony_server
- name: restart chronyd service handler
  become: true
  ansible.builtin.systemd:
    name: chronyd.service
    state: restarted
在 templates/ 目录下添加 chrony_server.conf.j2 模板文件,文件内容如下:
# Use public servers from the pool.ntp.org project.
# Please consider joining the pool (https://www.pool.ntp.org/join.html).
{% for ntp in ntp_server -%}
pool {{ ntp }} iburst
{% endfor -%}
# Use NTP servers from DHCP.
sourcedir /run/chrony-dhcp
# Record the rate at which the system clock gains/losses time.
driftfile /var/lib/chrony/drift
# Allow the system clock to be stepped in the first three updates
# if its offset is larger than 1 second.
makestep 1.0 3
# Enable kernel synchronization of the real-time clock (RTC).
rtcsync
# Enable hardware timestamping on all interfaces that support it.
#hwtimestamp *
# Increase the minimum number of selectable sources required to adjust
# the system clock.
#minsources 2
# Allow NTP client access from local network.
allow all
# Serve time even if not synchronized to a time source.
local stratum 3 orphan
# Require authentication (nts or key option) for all NTP sources.
#authselectmode require
# Specify file containing keys for NTP authentication.
keyfile /etc/chrony.keys
# Save NTS keys and cookies.
ntsdumpdir /var/lib/chrony
# Insert/delete leap seconds by slewing instead of stepping.
#leapsecmode slew
# Get TAI-UTC offset and leap seconds from the system tz database.
leapsectz right/UTC
# Specify directory for log files.
logdir /var/log/chrony
# Select which information is logged.
#log measurements statistics tracking
Chrony Server Role 完成了。
1.2.3 Chrony Client Role
Chrony Client Role 用来配置客户端,最终 Chrony Client 从 Chrony Server 同步时间。
Chrony Client 使用 Chrony Server 作为 NTP 服务,无需定义额外的变量,使用 Ansible 内置变量即可。
编辑 chrony_client/tasks/main.yml 文件,内容如下:
---
# tasks file for chrony_client
- name: install chronyd service task
  become: true
  ansible.builtin.dnf:
    name: chrony
    state: latest

- name: start chronyd service task
  become: true
  ansible.builtin.systemd:
    name: chronyd.service
    state: started
    enabled: true

- name: generate chrony.conf file from the template task
  become: true
  ansible.builtin.template:
    src: chrony_client.conf.j2
    dest: /etc/chrony.conf
    group: chrony
  notify: restart chronyd service handler
编辑 chrony_client/handlers/main.yml 文件,内容如下:
---
# handlers file for chrony_client
- name: restart chronyd service handler
  become: true
  ansible.builtin.systemd:
    name: chronyd.service
    state: restarted
在 chrony_client/templates/ 下创建 chrony_client.conf.j2 模板文件,内容如下:
# Use public servers from the pool.ntp.org project.
# Please consider joining the pool (https://www.pool.ntp.org/join.html).
{% for chrony_server in groups.ntp -%}
server {{ chrony_server  }} iburst
{% endfor -%}
# Use NTP servers from DHCP.
sourcedir /run/chrony-dhcp
# Record the rate at which the system clock gains/losses time.
driftfile /var/lib/chrony/drift
# Allow the system clock to be stepped in the first three updates
# if its offset is larger than 1 second.
makestep 1.0 3
# Enable kernel synchronization of the real-time clock (RTC).
rtcsync
# Enable hardware timestamping on all interfaces that support it.
#hwtimestamp *
# Increase the minimum number of selectable sources required to adjust
# the system clock.
#minsources 2
# Allow NTP client access from local network.
#allow 192.168.0.0/16
# Serve time even if not synchronized to a time source.
#local stratum 10
# Require authentication (nts or key option) for all NTP sources.
#authselectmode require
# Specify file containing keys for NTP authentication.
keyfile /etc/chrony.keys
# Save NTS keys and cookies.
ntsdumpdir /var/lib/chrony
# Insert/delete leap seconds by slewing instead of stepping.
#leapsecmode slew
# Get TAI-UTC offset and leap seconds from the system tz database.
leapsectz right/UTC
# Specify directory for log files.
logdir /var/log/chrony
# Select which information is logged.
#log measurements statistics tracking
在 Client 模板配置文件中,采用 Ansible 内置的 groups.ntp 变量,该变量的值是一个列表,返回 ntp 组中定义的所有主机,因此使用 for 循环遍历该变量。
Roles 已经完成了,接下来编写 Playbook,完成 Chrony 的部署。
1.3 部署 Chrony Server
在 ~/playbooks/ 目录下创建 deploy_chrony_server/ 目录,用来存放部署 Chrony Server 相关的文件:
mkdir ~/playbooks/deploy_chrony_server/
cd ~/playbooks/deploy_chrony_server/

在该目录下创建 deploy_chrony_server.yaml 文件,内容如下:
---
- name: deploy ntp server play
  hosts: ntp
  become: true
  gather_facts: false

  roles:
    - role: upgrade_packages
      tags: upgrade_packages
    - role: chrony_server
      tags: chrony_server
...
Playbook 的内容非常简短,在 roles: 部分引用了两个 Role:upgrade_packages 和 chrony_server。upgrade_packages Role 用来更新 dnf 包,~/roles/upgrade_packages/tasks/main.yml 内容如下:
---
# tasks file for upgrade_packages
- name: upgrade packages task
  ansible.builtin.dnf:
    update_cache: true
    name: "*"
    state: latest
  register: upgradeResult

- name: reboot system task
  reboot:
  when: upgradeResult.changed
可以根据这段内容,试着用前面介绍的方式,创建 upgrade_packages Role。
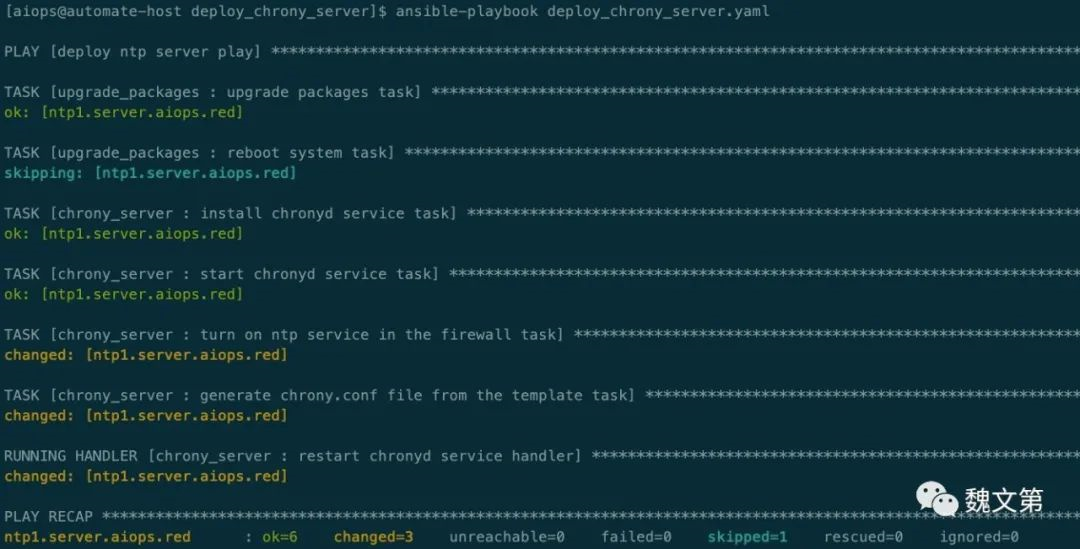
执行 deploy_chrony_server.yaml Playbook 文件,部署 Chrony Server:
ansible-playbook deploy_chrony_server.yaml
1.4 部署 Chrony Client
在 ~/playbooks/ 目录下创建 deploy_chrony_client/ 目录,用来存放部署 Chrony Client 相关的文件:
mkdir ~/playbooks/deploy_chrony_client
cd ~/playbooks/deploy_chrony_client

在该目录下创建 deploy_chrony_client.yaml 文件,内容如下:
#!/usr/bin/env ansible-playbook
---
- name: deploy ntp client play
  hosts: all:!ntp
  become: true
  gather_facts: false

  roles:
    - role: upgrade_packages
      tags: upgrade_packages
    - role: chrony_client
      tags: chrony_client
...
在部署 Chrony Client 时,主机组过滤了包含 Chrony Server 的 ntp 组。
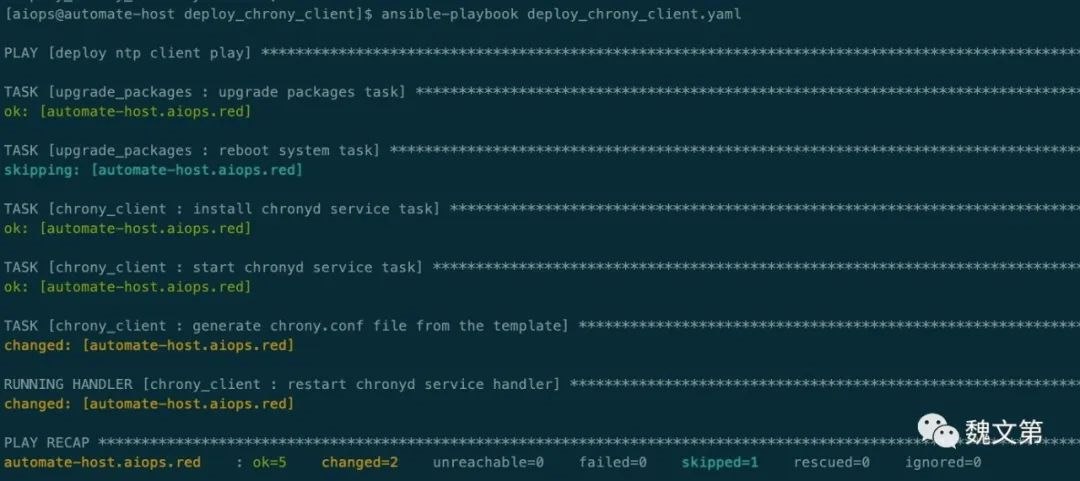
执行 deploy_chrony_client.yaml Playbook 文件,部署 Chrony Client:
ansible-playbook deploy_chrony_client.yaml
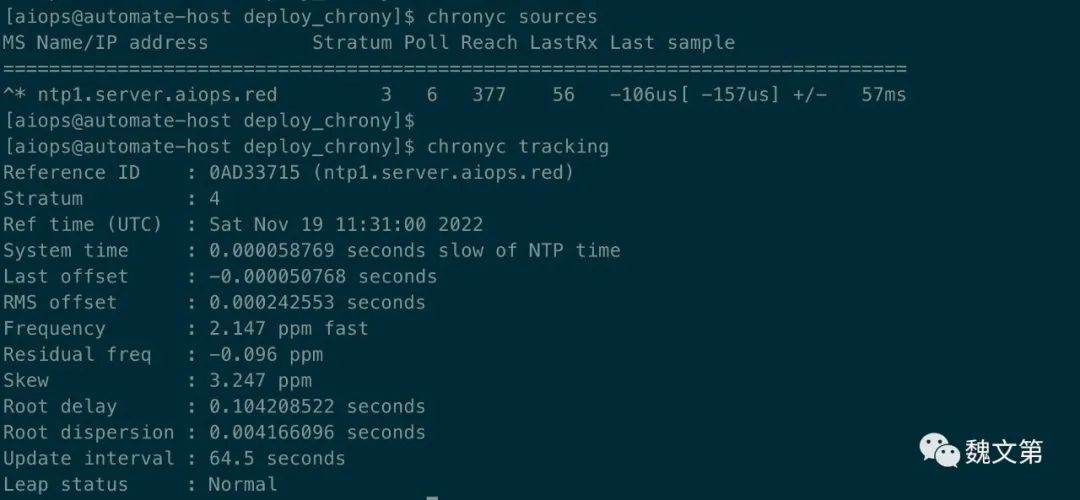
使用 chronyc sources 和 chronyc tracking 命令检查 Chrony Client 使用的 NTP 地址:
1.5 总结
本文介绍了 Ansible Roles,以及如何通过 Ansible Roles 自动化部署 Chrony NTP 服务。在配置初始化环境时,非常有帮助。


本文作者:Gustav
本文链接:
版权声明:本博客所有文章除特别声明外,均采用 BY-NC-SA 许可协议。转载请注明出处!