
目录
1. Nginx配置文件初识
1.1 Nginx配置文件在哪
由于我们在编译的时候设置了--prefix选项,指定前缀路径是/usr/local/nginx,那么默认的配置文件就在/usr/local/nginx/conf/nginx.conf。如果找不到配置文件也没关系,我们有以下方式来查看配置文件:
[root@nginx-18 ~]# cd /usr/local/nginx/sbin/
[root@nginx-18 ~]#  ./nginx -t
nginx: the configuration file /usr/local/nginx-1.18.0/conf/nginx.conf syntax is ok
nginx: configuration file /usr/local/nginx-1.18.0/conf/nginx.conf test is successful
1.2 Nginx目录结构
[root@nginx-18 ~]#  tree /usr/local/nginx
/usr/local/nginx
├── client_body_temp
├── conf                          #Nginx的主配置文件所在的目录
│   ├── fastcgi.conf              #fastcgi相关参数的配置文件
│   ├── fastcgi.conf.default      #fastcgi的默认配置文件
│   ├── fastcgi_params            #fastcgi参数文件
│   ├── fastcgi_params.default
│   ├── koi-utf
│   ├── koi-win
│   ├── mime.types                #媒体类型
│   ├── mime.types.default
│   ├── nginx.conf                #Nginx的主配置文件
│   ├── nginx.conf.default        #这是nginx的备份配置文件
│   ├── scgi_params
│   ├── scgi_params.default
│   ├── uwsgi_params
│   ├── uwsgi_params.default
│   └── win-utf
├── fastcgi_temp
├── html                          #默认站点目录
│   ├── 50x.html                  #错误页面优雅替代显示文件
│   └── index.html                #默认的首页文件,在实际环境中,大家习惯用
├── logs                          #日志文件目录
│   ├── access.log                #访问日志文件
│   ├── error.log                 #错误日志文件
│   └── nginx.pid                 #这是nginx的PID文件,nginx进程启动后,这个文件会随着nginx启动而产生
├── proxy_temp
├── sbin                          #Nginx的二进制文件目录
│   └── nginx                     #Nginx的二进制文件
├── scgi_temp
└── uwsgi_temp
以上加了注释的,是比较重要,需要我们知道的,其他就无所谓了,了解即可
1.3 Nginx配置文件
#启动子进程程序默认用户
#user  nobody;
#一个主进程和多个工作进程。工作进程是单进程的,且不需要特殊授权即可运行;这里定义的是工作进程数量
worker_processes  1;
#全局错误日志的位置及日志格式
#error_log  logs/error.log;
#error_log  logs/error.log  notice;
#error_log  logs/error.log  info;
#pid        logs/nginx.pid;
events {
    #每个工作进程最大的并发数
    worker_connections  1024;
}
#http服务器设置
http {
    #设定mime类型,类型由mime.type文件定义
    include       mime.types;
    #
    default_type  application/octet-stream;
    #日志格式
    #log_format  main  '$remote_addr - $remote_user [$time_local] "$request" '
    #                  '$status $body_bytes_sent "$http_referer" '
    #                  '"$http_user_agent" "$http_x_forwarded_for"';
    #$remote_addr与$http_x_forwarded_for用以记录客户端的ip地址;
    #$remote_user:用来记录客户端用户名称;
    #$time_local: 用来记录访问时间与时区;
    #$request: 用来记录请求的url与http协议;
    #$status: 用来记录请求状态;成功是200,
    #$body_bytes_sent :记录发送给客户端文件主体内容大小;
    #$http_referer:用来记录从那个页面链接访问过来的;
    #$http_user_agent:记录客户浏览器的相关信息;
    #全局访问日志路径
    #access_log  logs/access.log  main;
    #sendfile指令指定 nginx 是否调用sendfile 函数(zero copy 方式)来输出文件,对于普通应用,必须设为on。如果用来进行下载等应用磁盘IO重负载应用,可设置为off,以平衡磁盘与网络IO处理速度,降低系统uptime。
    sendfile        on;
    #此选项允许或禁止使用socke的TCP_CORK的选项,此选项仅在使用sendfile的时候使用
    #tcp_nopush     on;
    #长连接超时时间
    #keepalive_timeout  0;
    keepalive_timeout  65;
    #开启压缩
    #gzip  on;
    #配置虚拟主机
    server {
        #虚拟主机使用的端口
        listen       80;
        #虚拟主机域名
        server_name  localhost;
        #虚拟主机支持的字符集
        #charset koi8-r;
        #虚拟主机的访问日志路径
        #access_log  logs/host.access.log  main;
        #定义web根路径
        location / {
            #根目录路径
            root   html;
            #默认的页面文件名称
            index  index.html index.htm;
        }
        #error_page  404              /404.html;
        # redirect server error pages to the static page /50x.html
        #
        #根据错误码 返回对应的页面
        error_page   500 502 503 504  /50x.html;
        #定义页面路径
        location = /50x.html {
            root   html;
        }
        #定义反向代理服务器 数据服务器是lamp模型
        # proxy the PHP scripts to Apache listening on 127.0.0.1:80
        #
        #location ~ \.php$ {
        #    proxy_pass   http://127.0.0.1;
        #}
        #定义PHP为本机服务的模型
        # pass the PHP scripts to FastCGI server listening on 127.0.0.1:9000
        #
        #location ~ \.php$ {
        #    root           html;
        #    fastcgi_pass   127.0.0.1:9000;
        #    fastcgi_index  index.php;
        #    fastcgi_param  SCRIPT_FILENAME  /scripts$fastcgi_script_name;
        #    include        fastcgi_params;
        #}
        # deny access to .htaccess files, if Apache's document root
        # concurs with nginx's one
        #
        #拒绝nginx DR目录及子目录下的.htaccess文件访问
        #location ~ /\.ht {
        #    deny  all;
        #}
    }
    # another virtual host using mix of IP-, name-, and port-based configuration
    #
    #server {
    #    listen       8000;
    #    listen       somename:8080;
    #    server_name  somename  alias  another.alias;
    #    location / {
    #        root   html;
    #        index  index.html index.htm;
    #    }
    #}
    #https的配置方案
    # HTTPS server
    #
    #server {
    #    listen       443 ssl;
    #    server_name  localhost;
    #    ssl_certificate      cert.pem;
    #    ssl_certificate_key  cert.key;
    #    ssl_session_cache    shared:SSL:1m;
    #    ssl_session_timeout  5m;
    #    ssl_ciphers  HIGH:!aNULL:!MD5;
    #    ssl_prefer_server_ciphers  on;
    #    location / {
    #        root   html;
    #        index  index.html index.htm;
    #    }
    #}
}
2. 必要的全局配置选项
user  nobody;  #启动Nginx工作进程的用户和组
worker_processes  auto;  #启动Nginx工作进程的数量,auto:自动根据当前服务器的核数来定义

worker_cpu_affinity 00000001 00000010 00000100 00001000; #将Nginx⼯作进程绑定到指定的CPU核⼼,默认Nginx是不进⾏进程绑定的,绑定并不是意味着当前nginx进程独占以⼀核⼼CPU,但是可以保证此进程不会 运⾏在其他核⼼上,这就极⼤减少了nginx的⼯作进程在不同的cpu核⼼上的来回跳转,减少了CPU对进程的资源分配与 回收以及内存管理等,因此可以有效的提升nginx服务器的性能。

error_log   "/worker/log/error.log"   warn;  #错误日志记录配置
pid         "/worker/pid/nginx.pid";  #pid文件保存路径

worker_priority 0; #⼯作进程nice值,-20~19
worker_rlimit_nofile 65536; #这个数字包括Nginx的所有连接(例如与代理服务器的连接等),⽽不仅仅是与客⼾端的连接,另⼀个考虑因素是实际的并发连接数不能超过系统级别的最⼤打开⽂件数的限制。最好与ulimit -n或者limits.conf的值保持一致

daemon off; #前台运⾏Nginx服务⽤于测试、docker等环境。

events {
  use epoll;  #使用epoll事件驱动,Nginx支持众多的时间驱动,比如select、poll、epoll,只能设置在events模块中设置
  worker_connections  65536;  #设置单个工作进程的最大并发连接数

  accept_mutex on;  #优化同⼀时刻只有⼀个请求⽽避免多个睡眠进程被唤醒的设置,on为防⽌被同时唤醒默认为off,全部唤醒的过程也成为"惊群",因此nginx刚安装完以后要进⾏适当的优化。
  multi_accept on;  #Nginx服务器的每个⼯作进程可以同时接受多个新的⽹络连接,但是需要在配置⽂件中配置,此指令默认为关闭,即默认为⼀个⼯作进程只能⼀次接受⼀个新的⽹络连接,打开后⼏个同时接受多个。
}

http {
  include       mime.types;  #导入支持的文件类型
  default_type  application/octet-stream;  #设置默认的类型,会提示下载不匹配的类型文件

  #日志配置部分
  log_format  main  '$remote_addr - $remote_user [$time_local] "$request" '
                        '$status $body_bytes_sent "$http_referer" '
                        '"$http_user_agent" "$http_x_forwarded_for"';

  access_log  "/worker/log/access.log"  main;  #定义访问日志的路径

  server_tokens off;  #是否在响应报文的server首部显示nginx版本,off表示不显示,默认值为on

  server_names_hash_bucket_size 128;
  client_header_buffer_size 4k;
  large_client_header_buffers 4 32k;
  client_max_body_size 20m;  #设置允许客户端上传单个文件的最大值,默认值为1m,上传文件超过此值会出现413错误
  client_body_buffer_size 4m;  #用于接收每个客户端请求报文的body部分的缓冲大小。默认为16K。超出此大小时,其将被暂存到磁盘上的由下面client_body_temp_path指令所定义的位置
  client_body_temp_path path;  #设定存储客户端请求报文的body部分的临时存储路径及子目录结构和数量,目录名为16进制的数字,使用hash之后的值从后往前截取1位、2位、2位作为目录名。

  sendfile        on;  #实现文件零拷贝
  tcp_nopush      on;  #在开启了sendfile的情况下,合并请求后统⼀发送给客⼾端
  tcp_nodelay     on;  #在开启了keepalived模式下的连接是否启⽤TCP_NODELAY选项,当为off时,延迟0.2s发送,默认On时,不延迟发送,⽴即发送⽤⼾相应报⽂
  keepalive_timeout 65 65; #设置会话保持时间,0表示禁止长连接,默认为75s,通常配置在http字段作为站点全局配置
  keepalive_requests 3;  #在一次长连接上所允许请求的资源的最大数量,默认为100次,建议适当调大,比如:500
  #开启长连接后,返回客户端的会话保持时间为60s,单次长连接累计请求达到指定次数请求或65秒就会被断开,后面的65是发送给客户端响应报文头部中显示的超时时间,如果不设置客户端将不显示超时时间。


  gzip on;  #开启文件压缩
  gzip_min_length 1k;
  gzip_buffers 4 16k;
  gzip_http_version 1.0;
  gzip_comp_level 2;
  gzip_types text/plain application/x-javascript text/css application/xml;
  gzip_vary on;

  server {
    listen  80;  #设置监听地址和端口
    server_name www.test.com;  #定义主机名
    charset utf-8; #设置编码格式,默认是俄语格式,可以改为utf-8
    location ~ \.php$ {  #以http的⽅式转发php请求到指定web服务器
      root            /project/src;
      fastcgi_pass    127.0.0.1:9000;
      fastcgi_index   index.php;
      fastcgi_param  SCRIPT_FILENAME $document_root$fastcgi_script_name;
      include         fastcgi.conf;
    }
    location / {
      root            /static;
    }
  }
}
2.1 全局配置指令详解
user指令
我们知道,操作系统中的所有资源都具有所属者以及其他各种访问权限(强大的Linux也不例外~)。这种权限控制可以让操作系统变得很安全,防止黑客破坏我们的系统。Nginx提供了user全局配置指令来设置worker进程的所属者,这样就可以让Nginx访问特定权限的资源,保护我们服务器的稳定性。

我们可以通过ps命令查看worker进程,可以看到这个进程的所属者是nobody用户。
我们下面体验一下这个user的作用。
在上面体验Nginx的时候,我们成功的访问到了服务器上面的hello.html文件,并且返回了hello Nginx字符串。
下面我们修改hello.html文件的权限,删除nobody的可读权限,重新访问这个文件,这个时候Nginx就会返回403错误。
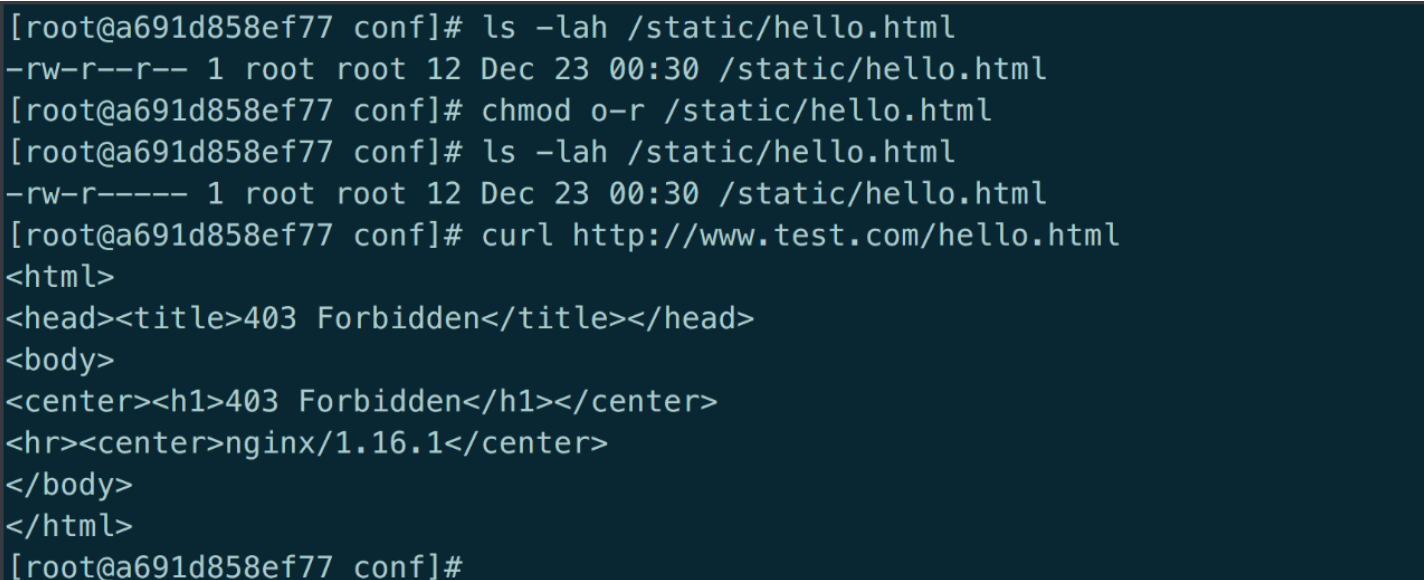
这里就是user指令的作用,大家是否熟悉了呢?
worker_processes 指令
我们前面说过,Nginx是一个Master-Worker的工作模式。Nginx在启动之后会生成一个master进程,master不处理请求,而是生成和管理worker进程,worker进程主要负责干活(处理请求)。那么大家可能要问了?这个值应该设置为多大呢?是不是这个值越大越好?当然不是了,我们看一下大神们给出的建议:
nginx doesn't benefit from more than one worker per CPU.
If Nginx is doing CPU-intensive work such as SSL or gzipping and you have 2 or more CPUs/cores, then you may set worker_processes to be equal to the number of CPUs or cores.

###################################################################
nginx不会从每个CPU超过一个worker中获益。
如果Nginx正在进行CPU密集型的工作,比如SSL或gzip,并且您有2个或更多的CPU/核心,那么您可以将worker_进程设置为等于CPU或核心的数量。
所以worker_processes的值并不是越多越好,最好是和我们服务器CPU核数量一样。Nginx提供了一个默认的auto值就是这样的原理。
event配置
event是配置Nginx使用的事件处理机制的。我们一般选择epoll模型
location配置
在一个server中location配置段可存在多个,用于实现uri到文件系统的路径映射。nginx会根据用户请求的URI来检查定义的所有location,按一定的优化级找出一个最佳匹配,而后应用其配置。
在没有使用正则表达式的时候,nginx会先在server中的多个location选取匹配度最高的一个uri,uri是用户请求的字符串,即域名后面的web文件路径,然后使用该location模块中的正则url和字符串,如果匹配成功就结束搜索,并使用此location处理此请求。
#语法规则
= 严格匹配。如果这个查询匹配,那么将停止搜索并立即处理此请求。
~ 为区分大小写匹配(可用正则表达式)
!~为区分大小写不匹配
~* 为不区分大小写匹配(可用正则表达式)
!~*为不区分大小写不匹配
^~ 如果把这个前缀用于一个常规字符串,那么告诉nginx 如果路径匹配那么不测试正则表达式。
不带符号  匹配起始于此uri的所有的uri

#匹配优先级从高到低
= ^~ ~/~* 不带符号
列子,有如下匹配规则:
location = / {
   #规则A
}
location = /login {
   #规则B
}
location ^~ /static/ {
   #规则C
}
location ~ \.(gif|jpg|png|js|css)$ {
   #规则D
}
location ~* \.png$ {
   #规则E
}
location !~ \.xhtml$ {
   #规则F
}
location !~* \.xhtml$ {
   #规则G
}
location / {
   #规则H
}

那么产生的效果如下:
访问根目录/, 比如http://localhost/ 将匹配规则A

访问 http://localhost/login 将匹配规则B,http://localhost/register 则匹配规则H

访问 http://localhost/static/a.html 将匹配规则C

访问 http://localhost/a.gif, http://localhost/b.jpg 将匹配规则D和规则E,但是规则D顺序优先,规则E不起作用,而 http://localhost/static/c.png 则优先匹配到 规则C

访问 http://localhost/a.PNG 则匹配规则E, 而不会匹配规则D,因为规则E不区分大小写。

访问 http://localhost/a.xhtml 不会匹配规则F和规则G,http://localhost/a.XHTML不会匹配规则G,因为不区分大小写。规则F,规则G属于排除法,符合匹配规则但是不会匹配到,所以想想看实际应用中哪里会用到。

访问 http://localhost/category/id/1111 则最终匹配到规则H,因为以上规则都不匹配,这个时候应该是nginx转发请求给后端应用服务器,比如FastCGI(php),tomcat(jsp),nginx作为方向代理服务器存在
实际的生产环境:
#直接匹配网站根,通过域名访问网站首页比较频繁,使用这个会加速处理,官网如是说。
#这里是直接转发给后端应用服务器了,也可以是一个静态首页
# 第一个必选规则
location = / {
    proxy_pass http://tomcat:8080/index
}

# 第二个必选规则是处理静态文件请求,这是nginx作为http服务器的强项
# 有两种配置模式,目录匹配或后缀匹配,任选其一或搭配使用
location ^~ /static/ {
    root /webroot/static/;
}
location ~* \.(gif|jpg|jpeg|png|css|js|ico)$ {
    root /webroot/res/;
}

#第三个规则就是通用规则,用来转发动态请求到后端应用服务器
#非静态文件请求就默认是动态请求,自己根据实际把握
#毕竟目前的一些框架的流行,带.php,.jsp后缀的情况很少了
location / {
    proxy_pass http://tomcat:8080/
}
3. Nginx虚拟主机实战
3.1 什么是虚拟主机
说起虚拟主机,想必对于程序猿来说,这个东西并不陌生。阿里云,腾讯云,百度云等云服务器厂商都提供虚拟主机服务,使得普通人可以以很低的价格拥有自己的主机,我们可以搭建自己的网站,博客等。
那么究竟是什么是虚拟主机呢?不知道大家是不是真正的理解这个概念。
我们看一下维基百科对虚拟主机的解释:
虚拟主机(英语:virtual hosting)或称共享主机(shared web hosting),又称虚拟服务器,是一种在单一主机或主机群上,实现多网域服务的方法,可以运行多个网站或服务的技术。虚拟主机之间完全独立,并可由用户自行管理,虚拟并非指不存在,而是指空间是由实体的服务器延伸而来,其硬件系统可以是基于服务器群,或者单个服务器。
其实简单的来说,虚拟主机就是多个网站使用同一个物理服务器,每一个服务器都可以单独的向外界提供服务,互不影响。虚拟主机之间完全独立,在外界看来,每一台虚拟主机都和一台独立的主机表现的完全一致。
虚拟主机的出现,对互联网来说是一个非常重要的贡献,由于可以让多个虚拟主机共享一台物理主机的所有资源,所以让每个用户承担的成本也大大的降低了。
Nginx作为一个广泛应用的Web服务器,支持三种形式的虚拟主机配置:
- 基于端口号的主机配置
- 基于
ip的主机配置 - 基于域名的主机配置
我们逐个介绍这几种配置方式。
3.2 基于端口号的主机配置
所谓基于端口的主机配置就是多个虚拟主机的ip地址相同,但是他们的端口不同,我们可以通过端口号来访问不同的虚拟主机。我们以8081, 8082,8083三个端口为例来了解这种配置。
为每一个端口号创建目录
1. 在/usr/local/nginx/html/目录下面创建port子目录2. 在port下面创建8081,8082,8083三个子目录、3. 每个子目录分别创建各个端口的index文件
[root@nginx-18 ~]#  cd /usr/local/nginx/html/
[root@nginx-18 html]# mkdir -p port
[root@nginx-18 html]# cd port/
[root@nginx-18 port]# mkdir -p 8081 8082 8083
[root@nginx-18 port]# tree /usr/local/nginx/html/port/
/usr/local/nginx/html/port/
├── 8081
├── 8082
└── 8083

3 directories, 0 files
[root@nginx-18 port]# echo "8081 port" > 8081/index.html
[root@nginx-18 port]# echo "8082 port" > 8082/index.html
[root@nginx-18 port]# echo "8083 port" > 8083/index.html
[root@nginx-18 port]# tree /usr/local/nginx/html/port/
/usr/local/nginx/html/port/
├── 8081
│   └── index.html
├── 8082
│   └── index.html
└── 8083
    └── index.html

3 directories, 3 files
修改配置文件
修改/usr/local/nginx/conf目录下面的nginx.conf文件,如下:
    server {
        listen       8081;
        server_name  localhost;


        location / {
            root   html/port/8081/;
            index  index.html index.htm;
        }

        error_page   500 502 503 504  /50x.html;
        location = /50x.html {
            root   html;
        }

    }

    server {
     listen       8082;
     server_name  localhost;

     location / {
      root   html/port/8082/;
      index index.htm index.html;
     }

        error_page   500 502 503 504  /50x.html;
        location = /50x.html {
            root   html;
        }

    }

    server {
     listen       8083;
     server_name  localhost;

    location / {
     root html/port/8083/;
     index inde.htm index.html;
    }

    error_page   500 502 503 504  /50x.html;
    location = /50x.html {
          root   html;
    }
}
启动nginx并进行请求
我们启动nginx之后,查看系统的端口情况如下: 可以看到,三个端口都已经被监听了。
[root@nginx-18 sbin]# ss -lntp|grep nginx
LISTEN     0      128          *:8081                     *:*                   users:(("nginx",pid=29853,fd=10),("nginx",pid=20542,fd=10))
LISTEN     0      128          *:8082                     *:*                   users:(("nginx",pid=29853,fd=11),("nginx",pid=20542,fd=11))
LISTEN     0      128          *:8083                     *:*                   users:(("nginx",pid=29853,fd=12),("nginx",pid=20542,fd=12))
测试端口
我们可以通过curl命令测试各个端口,如下:
[root@nginx-18 sbin]# curl http://localhost:8081/index.html
8081 port
[root@nginx-18 sbin]# curl http://localhost:8082/index.html
8082 port
[root@nginx-18 sbin]# curl http://localhost:8083/index.html
8083 port
3.3 基于IP的虚拟主机
所谓基于IP的虚拟主机就是将虚拟主机绑定到不同的IP地址。我们可以通过不同的IP地址访问不同的虚拟主机。但是这种模式企业里面用的比较少,所以我们只需要了解一下即可。
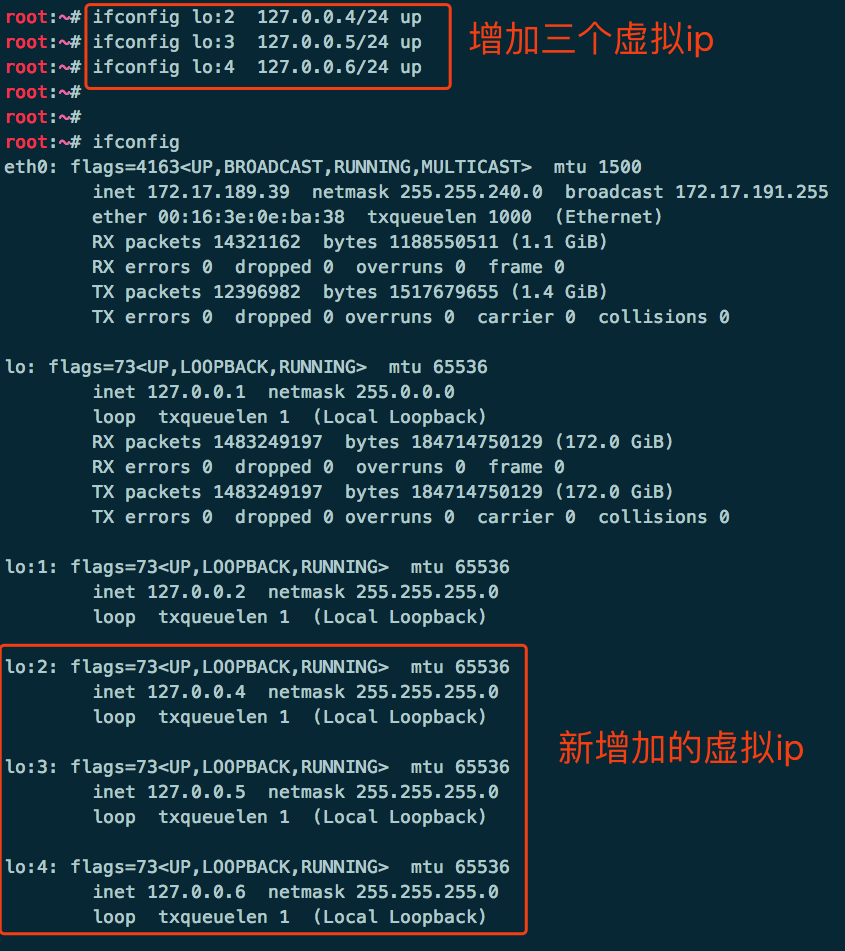
配置IP
一般情况下,我们自己的电脑都只会有最多两个网卡,这个时候我们可以使用ifconfig命令来增加几个虚拟网卡来完成本次实验。如下:
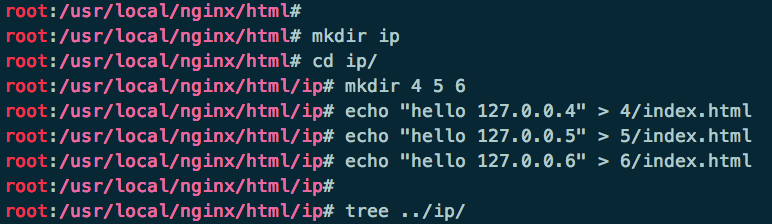
为每个IP设置目录
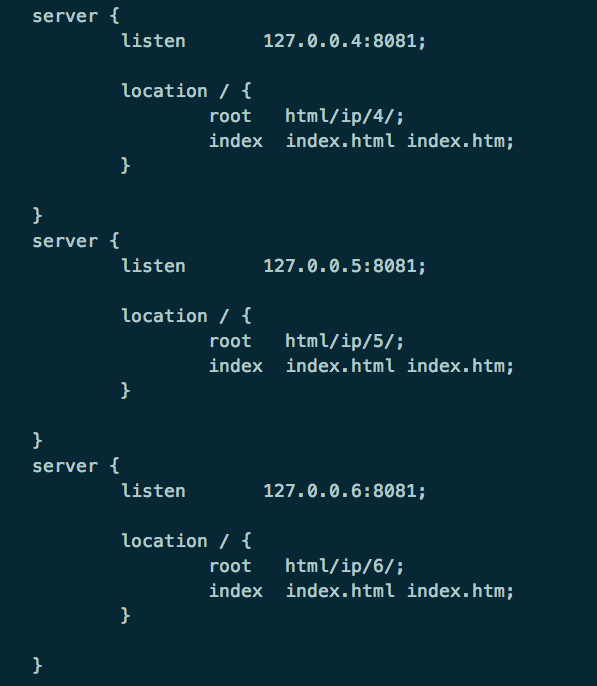
修改配置文件
针对每一个IP,设置配置文件:
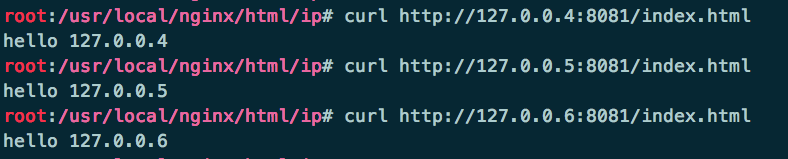
测试各个IP
启动Nginx,并使用不同的IP进行访问,得到的结果如下:
3.4 基于域名的虚拟主机
所谓基于域名的虚拟主机是非常广泛的一种使用方式,绝大多数公司都是使用该种方式配置的虚拟主机。
配置域名
在/etc/hosts文件中配置三个域名,分别如下:
[root@nginx-18 sbin]# cat /etc/hosts
127.0.0.1   www.hr.com
127.0.0.1   www.platmis.com
127.0.0.1   www.napi.com
为域名创建目录
我们为每个域名创建一个单独的目录,创建index文件,如下:
[root@nginx-18 html]# mkdir -p domain
[root@nginx-18 html]# cd domain
[root@nginx-18 domain]# mkdir -p hr platmis napi
[root@nginx-18 domain]# echo "hello www.hr.com" > hr/index.html
[root@nginx-18 domain]# echo "hello www.platmis.com" > platmis/index.html
[root@nginx-18 domain]# echo "hello www.napi.com" > napi/index.html
[root@nginx-18 domain]# tree
.
├── hr
│   └── index.html
├── napi
│   └── index.html
└── platmis
    └── index.html

3 directories, 3 files
修改配置文件
对上面三个虚拟主机进行配置,如下:
user  nobody;
worker_processes  1;


events {
    worker_connections  1024;
}


http {
    include       mime.types;
    default_type  application/octet-stream;


    sendfile        on;

    keepalive_timeout  65;


    server {
        listen       80;
        server_name  www.hr.com;


        location / {
            root   html/domain/hr/;
            index  index.html index.htm;
        }

        error_page   500 502 503 504  /50x.html;
        location = /50x.html {
            root   html;
        }

    }

    server {
        listen       80;
        server_name  www.platmis.com;

        location / {
            root   html/domain/platmis/;
            index index.htm index.html;
        }

        error_page   500 502 503 504  /50x.html;
        location = /50x.html {
            root   html;
        }

    }

    server {
        listen       80;
        server_name  www.napi.com;

    location / {
        root html/domain/napi/;
        index inde.htm index.html;
    }

    error_page   500 502 503 504  /50x.html;
    location = /50x.html {
          root   html;
    }
}

}
我们对三个域名都监听了相同的IP地址和端口号。
测试域名
重启nginx之后,查看80端口,如下:
[root@nginx-18 conf]# ss -lntp|grep nginx
LISTEN     0      128          *:80                       *:*                   users:(("nginx",pid=31139,fd=7),("nginx",pid=20542,fd=7))
可以看到,nginx监听了80端口,我们分别测试三个域名:
[root@nginx-18 conf]# curl http://www.hr.com/index.html
hello www.hr.com
[root@nginx-18 conf]# curl http://www.platmis.com/index.html
hello www.platmis.com
[root@nginx-18 conf]# curl http://www.napi.com/index.html
hello www.napi.com
从结果中可以看到,虽然三个域名监听了相同的IP地址和端口号,但是通过域名进行访问的时候,nginx可以完美的区分不同的域名。
在本文中,我们介绍了Nginx支持的三种虚拟主机形式,根据我个人的经验来看,几乎所有的公司使用的都是最后一种,也就是基于域名的主机配置方式,这些东西并不难,大家注重理解就可以了。
3.5 root和alias
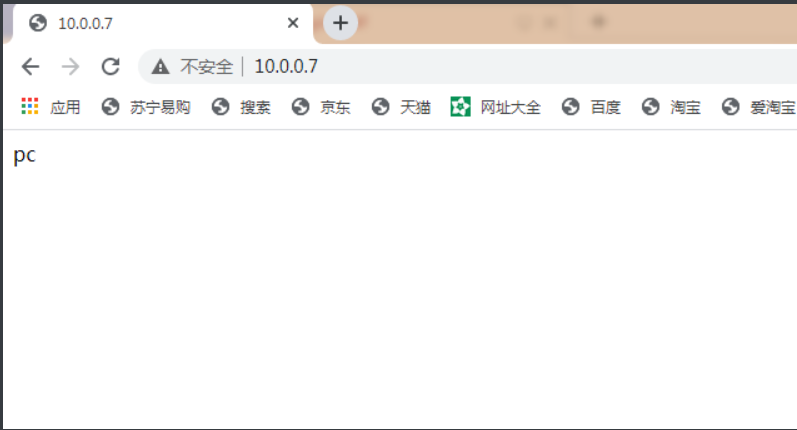
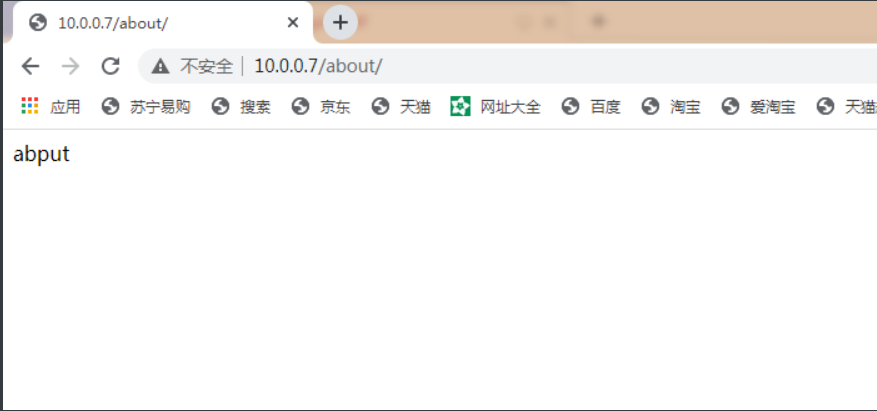
root:指定web的家⽬录,在定义location的时候,⽂件的绝对路径等于 root+location,如:
server {
   listen 80;
   server_name www.magedu.net;
   location / {
       root /data/nginx/html/pc;
       }
   location /about {
       root /data/nginx/html/pc; #必须要在html⽬录中创建⼀个about⽬录才可以访问,否则报错。
       index index.html;
       }
}

[root@nginx-07 pc]# mkdir /data/nginx/html/pc/about
[root@nginx-07 pc]# echo pc > /data/nginx/html/pc/index.html
[root@nginx-07 pc]# echo about > /data/nginx/html/pc/about/index.html

重启nginx并访问测试
alias:定义路径别名,会把访问的路径重新定义到其指定的路径,如:
server {
   listen 80;
   server_name www.magedu.net;
   location / {
      root /data/nginx/html/pc;
      }
   location /about { #使⽤alias的时候uri后⾯如果加了斜杠则下⾯的路径配置必须加斜杠,否则403
      alias /data/nginx/html/pc; #当访问about的时候,会显⽰alias定义的/data/nginx/html/pc⾥⾯的内容。
      index index.html;
      }
}

重启Nginx并访问测试
http://www.magedu.net/about/index.html #访问指定⽂件资源


本文作者:Gustav
本文链接:
版权声明:本博客所有文章除特别声明外,均采用 BY-NC-SA 许可协议。转载请注明出处!